Sunday, November 27, 2011

Ellen Hutson Anniversary Celebration

I have made one card for two of the challenges over at Ellen Hutson's Classroom.  A color swatch challenge by Julie Ebersole and a sketch challenge by Julia Stainton.  I was delighted to find that I have a pad of My Mind's Eye Wonderful winter glittered holiday papers, bought on sale two years ago with exactly the colors of the swatch challenge.  How fun is that?  So I used the sketch from Julia and the card was easy-peasy!
EHColorChallengeAnniversary
Ellen-sketch-black-friday-wphoto

The card base is Papertrey Ink White card stock, the sentiment and snowflake are from Tag-its # 10 stamped with Memento Rose bud and Rhubarb Stalk.  The snowflake has a few touches with a Sakura Rose Star pen to give it a little shine and the Spellbinder Lacy Circle is matted under the sentiment circle punched with a 1 3/4" EK Success punch.

So check all the fun stuff happening at Ellen Hutson's and thanks for taking a look tonight!

Glad you stopped by,
Suzanne

Saturday, November 26, 2011

Make It Monday #42: Layered Background with Sentiment Stamps

Hello and Happy Saturday!

Well, the front door decorations are up and the Christmas  tree is in the living room.  We'll get to decorating it tonight after dinner.  For now, I have a card to show you that I have wanted to make since the release of Bells and Boughs.  When I saw the stamp set, I immediately recalled a sentiment from Inside and Out: Holiday and wanted to pair up the two, so this MIM challenge is exactly what I have been waiting for.  AND I got to use a product that is new for me.  Flower Soft makes border stickers that can be peeled off and cut to the length you need.  There are quite a few in the package and a good variety to choose from. It provides a very delicate detail but I like it applied here around the background layer.  Here's the card:

photo

I have listed the product details below.  Thanks so much for taking a peek today; 
please let me know what you think!

Glad you stopped by,
Suzanne


Product details:  (Papertrey Ink unless otherwise noted)

Card stock:  Scarlet Jewel, Vintage Cream, Ripe Avocado, Pine Feathers
Stamps:  Bells and Boughs, Inside and Out: Holiday, Fancy Flourishes
Inks: Memento Rhubarb Stalk, Haystack Palette, Forest Moss Distress Ink
Other:  Bells and Boughs Dies, Martha Stewart branch punch, Flower Soft Gold Stickers
            Gina K. Wine with Everything ribbon, Sakura Clear Star pen

Friday, November 25, 2011

November 2011 Blog Hop

The-Challenge
November Blog Hop Inspiration

I love traditional Christmas colors and decorating with natural greenery.  This image could evoke so many Christmas memories for me both as a child and as an adult.  In fact, I made this card today instead of putting the garland over the front door, but tomorrow, it will go up!  It's TRADITION to do the front porch decorating and put up our tree over the weekend following Thanksgiving.  

Here's my take on the inspiration photo:

photo

I focused on the overall color scheme with attention to the gingham checked pillow in the foreground.  Obviously, I included the garland descending the stairs accented with red ribbons. This photo truly inspires my sense of home, family and bringing together those we love in this joyous season.  So the sentiment and little house tag seemed to be the finishing touches the card needed.

I really enjoy sharing this part of my life with all of you and want to officially extend hopes for the "warmth and joy of the holidays" to you and yours.

Thanks for stopping by,
Suzanne

Products:
(Papertrey Ink unless otherwise noted)
Card Stock:  White, Pine Feather, Ripe Avocado
Stamps:  Love lives Here, Stylish Sentiments: Holiday, Background Basics: Gingham
Inks:  Ripe Avocado, Pure Poppy, Memento Tuxedo Black
Other:  Branch punch and red seam binding, both from Martha Stewart

Thursday, November 24, 2011

Snowflake Sparkle Redux

This card did not keep me awake last night, but it was the last thing on my mind as I went to bed, and the first thing on my mind this morning!  As you saw in the previous post, I not only struggled with the photography, but also with the design of the card.  I am happy with it now.  I hope you will like the revision as well!


photo

The photography is still poor, but I hope you can see more of the sparkle.  The focal image is mounted on white card stock edged in Tea Dye Distress Ink that was also highlighted with a Sakura Clear Star pen.  The top portion only of the focal image is popped up on dimensional foam.  The same ink and Clear Star pen were used on the sentiment.  The card base is also white card stock that has been colored using a Blending tool and Hero Arts Soft Pool ink to coordinate with the background of the focal image.

Additional products:  Hero arts stamp:  Merriest Christmas Wishes
                                  Distress Inks:  Gathered Twigs, Barn Door, Fired Brick
                                  Papertrey Ink stamps:  In the Meadow (sentiment & snowflake)
                                  Other:  AquaPen, White Embossing Powder, Colorbox Frost 
                                 White Pigment Ink

Thanks for stopping by again!
Suzanne

Wednesday, November 23, 2011

Crafting by Designs Challenge

Good evening and Happy Thanksgiving to you all.

Tomorrow is the feast, Friday the tree goes up and the front porch gets it's annual decorations.  The "Friendly Village" dinnerware goes on the table and we open a bottle of Beaujolais Nouveau in honor of the season of harvest.  I start playing my "peaceful holiday" station on Pandora while I make cards and other projects including some new delectables from the kitchen that I have found on Pinterest this year!  I will NOT be shopping on black Friday!!!

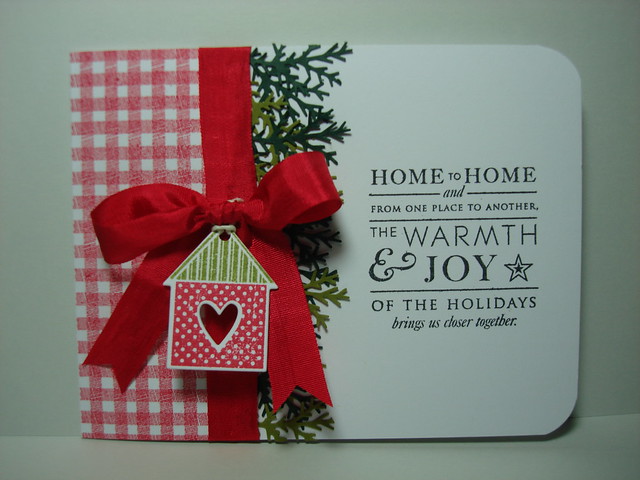
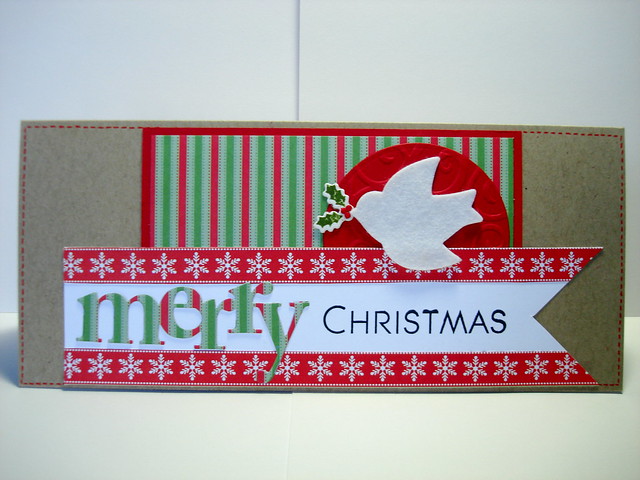
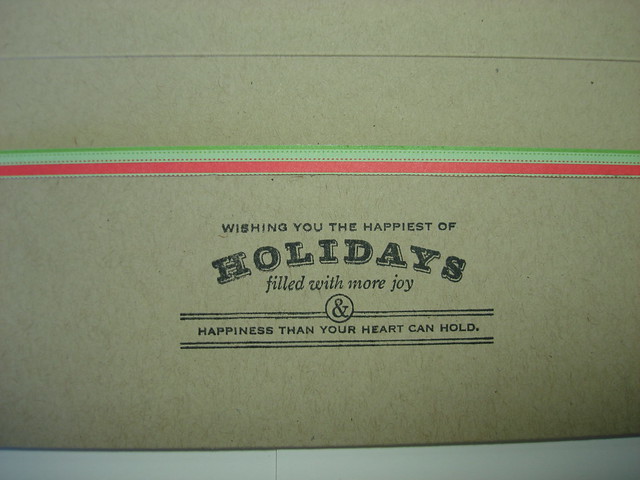
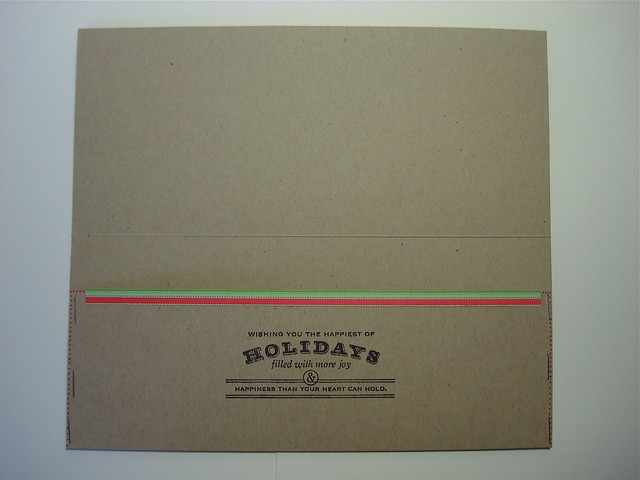
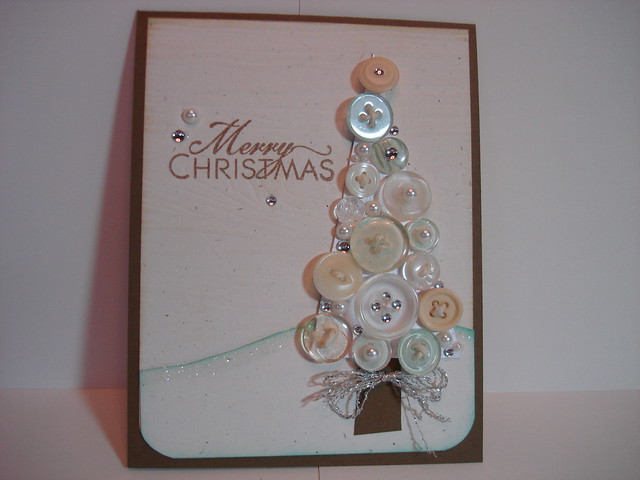
I actually have two cards to post tonight but the first one is for a challenge going on at Crafting By Designs.  This one is called 
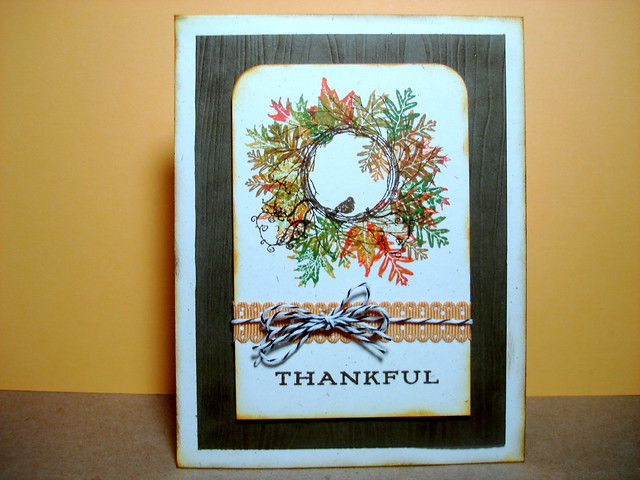
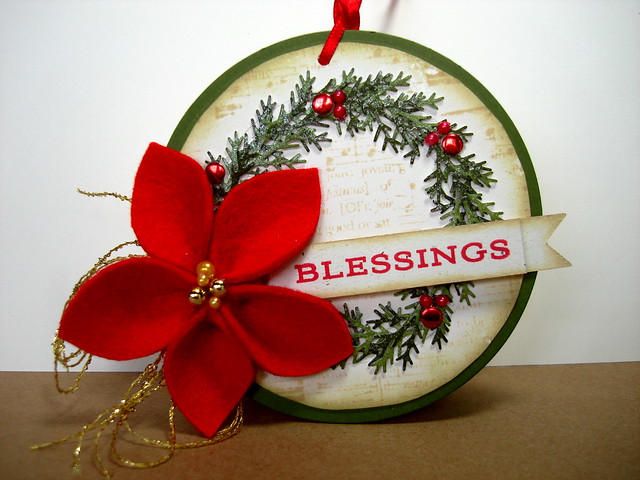
Tie it Up! requiring the use of ribbon, twine, etc. so here's my submission:

photo

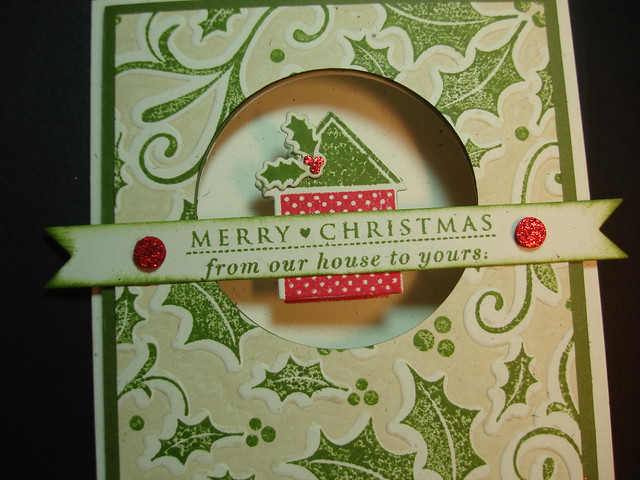
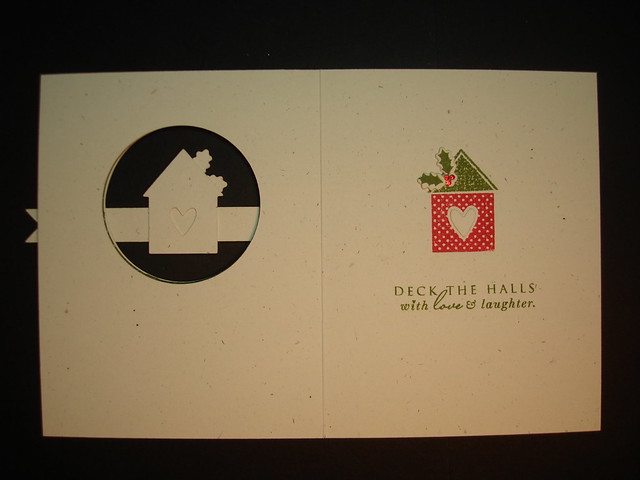
In the midst of all the new inks and stamp sets that I have acquired lately, I had an urge to bring out a set of peg stamps I haven't used in quite a while and combine them with this wreath.  It was fun to use the random stamping technique after so much attention to detail and precision on most of my cards.  The little bird perched in the center of the wreath is just an omen of what I will see as decorations go up outside my house!

products:
Card Stocks:  PTI Rustic Cream, SU! Soft Suede
Stamp sets:  In the Meadow-bird, Wreath for all Seasons, First Fruits-"Thankful" all PTI
                    Indian Summer pegs by Rubber Stamp Tapestry
Inks:  Gathered Twigs, Ripe Persimmon, Peeled Paint, Scattered Straw, Shabby Shutters, Wild Honey  
          (all Distress Ink by Ranger)
Other:  Woodgrain Impression Plate and Chocolate Baker's Twine by PTI
             Scalloped Dot More Mustard ribbon by SU!  

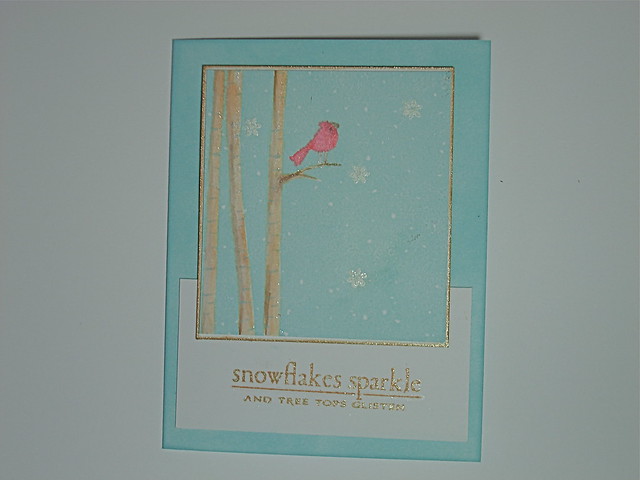
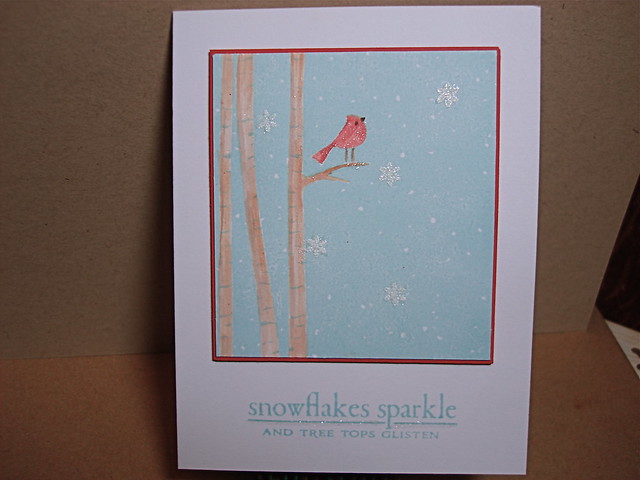
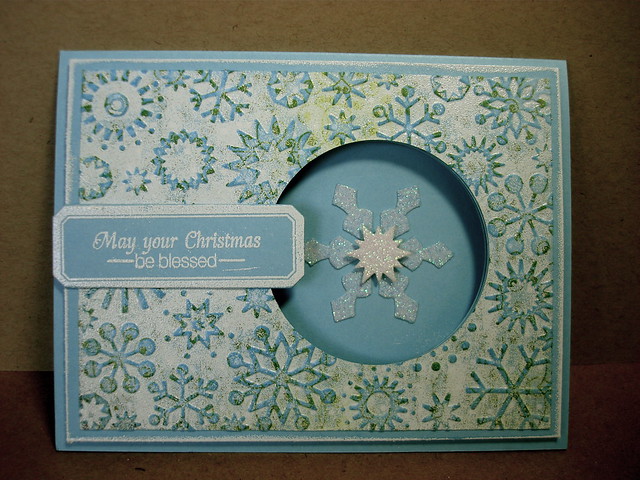
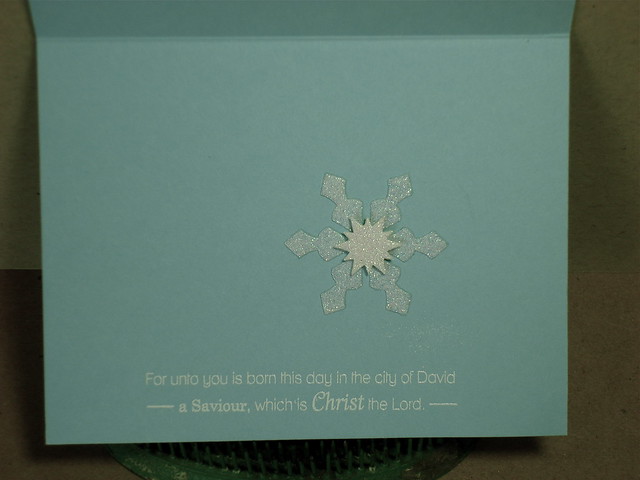
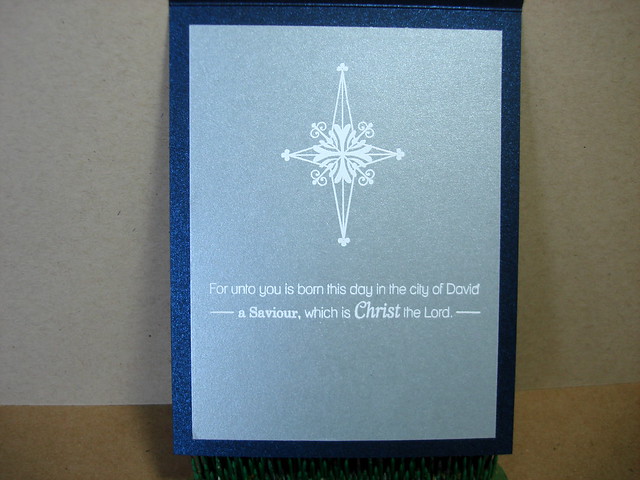
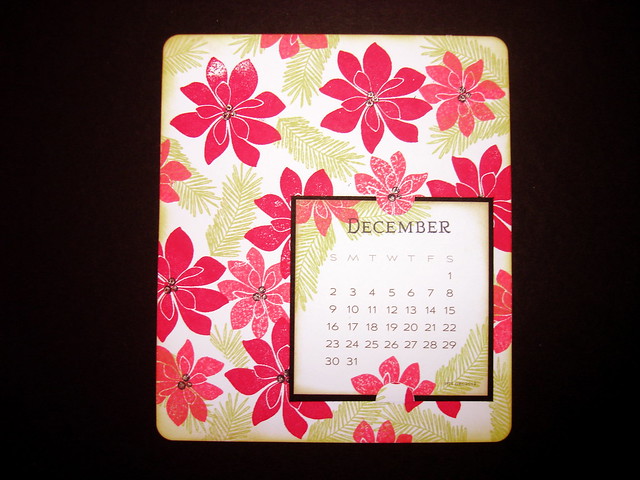
I apologize in advance for the photography on the next card.  It has a lot of glitter and it is nearly impossible for me to do a good job of photography with the equipment and lighting I currently have.  (I have a table top light box on my Christmas List!)  I was so excited to get this stamp because I saw Jennifer McGuire use it in one of her YouTube Videos and I fell in love with the watercoloring on the trees and bird.  As I said, I added a lot of glitter on the edges of the tree trunks, the small branch and the bird as well as along the center line of the sentiment below.  I also added some small snowflakes in white pigment ink, embossed them in white, and topped them with glitter, too. So use your imagination and maybe you can glimpse the happy sparkles that REALLY are there!

photo

One of these days I will learn how to put in my photos so that you can click on them to
 enlarge for details!

Products:
Card Stocks:  PTI-White, Pure Poppy
Stamps:  Hero Arts-Merriest Christmas Wishes, PTI-In the Meadow (snowflake and sentiment)
Inks:  Hero Arts-Soft Pool, Distress Inks-Tea Dye, Walnut Stain, Fired Brick, Barn Door, 
          Colorbox-Frost White Pigment
Other:  White Embossing Powder, Martha Stewart Fine crystal glitter, ZIG glue pen

In this season of gratitude, I am truly thankful to have met all of you and to share this 
passion for paper crafting with you.  As always, I would love to hear your thoughts 
and comments!

Thanks for stopping by, 
Suzanne

Sunday, November 20, 2011

More Holiday Card Boot Camp Projects


Good morning and happy Sunday!

I have really enjoyed this online class and learned so many new techniques, but I pooped out on my goal of daily posting what I had made.  So I have several to show you today.

This card is a composite of several techniques demonstrated by Jennifer McGuire.
1.  It is a gate-fold card which I rarely make but was glad to be reminded of the design.

2.  The background of the focal image is covered in a blend of Peeled Paint, Forest Moss, and Shabby Shutters Distress Inks.  Next, I used Hero Arts Holly background stamp, inked with Picket Fence Distress Stain, and misted with Perfect Pearls before applying it to the paper.  I love the watercolor-look achieved from this technique.

3.The dimensional holly leaves are hand made using a simple technique of punching a circle, then moving the paper over to re-punch on one side of the circle.  Then use a smaller punch (1/2") or hand cut the little shape around the edge.  They are cut from the paper colored with the blended Distress Inks.

Other products:  Papertrey Ink Vintage Cream and  Ripe Avocado Card stocks, Bitty Box Basics patterned paper, twine, red button and sentiment from Tremendous Treats: Christmas
Versamark ink, White embossing powder by Stampendous


photo

The next card is from a design by Julie Ebersole from Day 5:  Reproducible Cards. 
 I really like the way this turned out and plan to reproduce it on white and cream 
backgrounds as well as kraft.  Lots of stamping fun here!


photo


Products used:  (All Papertrey Ink) Kraft and Pure Poppy card stocks
Stamps:  Background Basics:Twinkle, Love Lives Here:Christmas, Holiday Lights, 
   Tree Trimming Trio (sentiment selectively inked)  
Die:  Double Banner
Inks: Pure Poppy, Summer Sunrise, Aqua Mist, Spring Moss, 
   Memento Tuxedo Black, Grape Jelly, Rose Bud, Versamark.
White Embossing Powder and White Gelly Roll Pen

The last card today is one of those unexpected things that really gives me a kick. 
Everything I put in this card was already laying on my work table as rejects or l
eftovers from other projects.   It came together almost magically.  The sentiment 
is provocative to me and made me think of Luke 2:19.  "But Mary
 treasured up all these things and pondered them in her heart."  
What imagination it must have taken for her to believe that her child would be
 the Savior of the world.  What awe and wonder she must have experienced as 
she watched Him grow into a man.  The inside of the card will have the contextual 
passage of Luke 2: 15-20.  Yes, I will make more of these.  
After all, He is the Reason for the season.


photo


Products Used:  from Papertrey Ink: Ripe Avocado, Vintage Cream Pure Poppy and Kraft card stocks, Holiday Spirit Sentiments stamp set, Holly Jolly Dies
Other:  Memento Tuxedo Black Ink, Martha Stewart punch, Sakura Glaze Pen
The "cedar branches" are colored and misted using the same process of applying distress inks described above although it is from a project previously posted. 

Monday, November 14, 2011

Holiday Card Boot Camp, Day 6, Projects 1 & 2

Hi There! 

I hope your new week has begun well.  Can you believe we will be eating turkey in just over a week?  In the U.S. at least.  I am truly grateful for many, many blessings and one of them is this terrific card class.  I have made several new friends and been offered new opportunities that I would not have had without it.  AND I am grateful for each of you that takes the time to visit and leave a comment.  You are much appreciated, indeed!

I am also submitting these two cards to Karen's challenge at littlescrappieces.blogspot.com.  You might like to drop by and see what's going on over there.

So...here are today's projects from HCBC

photo


I have never made a round card before, and honestly, I haven't made one yet!  I would rather see this on the outside of a gift so I am calling it a tag.  It was die cut with Spellbinders Standard Circles, large so the diameter is approx. 4".  There is a lot of improvisation on this project which required more time than the original project demonstrated by Jennifer McGuire.  The sketch is identical but that's where it ends.  My flower is hand made (according to Jennifer's instructions) as well as the wreath which is made up of two shades of green card stock punched with a Martha Stewart punch and overlapped on top of a circle of glue. Jennifer is such a whiz at using Distress Inks, I followed her lead and directly applied Peeled Paint and Forest Moss inks to a piece of white card stock to create the two shades of green.  These two squares were then spritzed with Perfect Pearls before the branches were punched.  The background is stamped on Papertrey Ink Vintage Cream card stock with Hero Arts, Collage Music Background, using Antique Linen Distress Ink.  The card front is Gina K. Fresh Asparagus and the back is Vintage Cream.  The little sentiment, from PTI First Fruits stamp set,  is die cut with PTI Double Ended Banners, stamped with PTI Pure Poppy Ink, on PTI Rustic White Card stock.  Assorted pearls and metallic embellishments were added to the wreath along with some gold yard I had in my stash for a little flourish around the flower. 


Sweet Hubby thinks this would make a nice ornament as well!


Project #2


photo


This card was inspired by Kristina Werner, one of the three sketches she made for our class today.   I have ended up being very pleased with it.   Again, I used the sketch just as it was presented, but changed the elements and sentiment.  I chose all Papertrey Ink products for this project except for the ink.  The Woodgrain Background Impression Plate gives some texture to the card base of Pure Poppy.  The Kraft layer is stamped with a sentiment from Holiday Spirit Sentiments using Gathered Twigs Distress Ink.  I also used this ink for edging all of the elements on the card and enhancing the woodgrain.  The kraft layer is tied up with Pure Poppy Baker's Twine and popped up on dimensional foam.  The leaves and berries are from Holly Jolly dies collection.


So there you have it.  Another day of getting to do what I enjoy most.  Yes, I am grateful, indeed!


Thanks for stopping by,
Suzanne

Sunday, November 13, 2011

Holiday Card Boot Camp, Day 3, Project #2

Happy Sunday!

My motor is already running...I can hardly wait to get back to class with HCBC.

Meanwhile, I have made another card inspired by Jennifer McGuire from her tutorial video on Day 3 of class.  I really like the vintage look achieved with this technique using Versamark ink on the impression side of an embossing folder and then heat embossing the card with white powder.  The most interesting part of this to me, is using a subtle color of patterned paper.  Here, I have used one from the Eskimo Kisses collection by Basic Grey (I think).  Jennifer actually sanded the raised design after removing it from the folder and before she enhanced it with distress ink.  I skipped that step, but used Tumbled Glass distress ink which did give a richer look to the project.  Using the same basic sketch, I turned it on it's side and scooted the sentiment over to the left so that the view of the sparkly snowflake mounted on the inside of the card would not be obstructed.  I love this sentiment (Star of Wonder by Papertrey Ink) in combination with the brief gospel message inside (from Silent Night, also by PTI).  The snowflake is made with Spellbinders Create a Flake #3 of white glitter paper by Recollections and the base layer has been colored with the same Tumbled Glass ink.  Spellbinders Standard Circles was used to cut the window in each of the three layers of paper.  The cardstock used here is Gina K. Ocean Mist.  The mat layer is edged with Versamark and heat  embossed with white powder, then adhered to the base card using dimensional foam.

photo

photo

The next card was started more than a week ago but I did not finish it until today so I thought I would just add it on.  I have repeated the sentiments outside and in but as you will see, I added the beautiful star from Silent Night to the inside.  These are all heat embossed with white powder.  The Card stocks used are PTI Night Sky and Silver Shimmer papers.  The stamp is Hero Arts Starry Night, stamped with Colorbox Frost White Ink.  the stamped layer is raised up on dimensional foam while the silver mat is not.  I have a lot of this silver thread I bought in a mixed lot from a weaver a long time ago. It works really well in a lot of unexpected ways.  The stars have been touched lightly with Icicles Stickles.

photo

photo

Well, I guess that's all for now.  Enjoy the rest of your weekend and I hope your week will be filled with peace and happiness.

 Thanks for stopping by,
Suzanne

Saturday, November 12, 2011

Babies and Birthdays!

Hello Everyone!

Happy Saturday to you.  Sweet Hubby is playing golf so I'm making cards.  I know, what a shocker!!

I had a baby shower to go to today and a friend's birthday coming up on Monday so while I am taking a break from making Christmas cards, I am still using inspiration from Holiday Card Boot Camp.  The first card to show today is made with a technique I learned from guest designer, Shari Carroll on Day #3.  On my card, I used Fired Brick and Spiced Marmalade Distress Inks to color the white card stock that had been stamped with this HUGE Hero Arts flower in Versamark and embossed in white powder.  The next step was the fun part.  I mixed some gold Perfect Pearls with water and misted the flower until the colors began to move.  This was set aside to dry, but in my impatience, I gave it a shot with my heat gun to speed up the process.  I also lightly misted the card base of Melon Berry card stock.  I attached the white layer to a gold shimmer layer, and mounted these on the card base with foam dimensional tape.  I seem to want everything to sparkle these days, so the  The "Happy Birthday" sentiment, from Big Birthday Wishes, is embossed in Detail Gold.

photo  


Now, this birthday girl has been on a mission to lose some serious pounds and she is going to announce exactly how many on her birthday.  So, I thought it fitting to offer a non-traditional message inside the card:

photo

And she really does!

Next up, is the happy baby card for my friend Meagan.  It's her first and this little bundle will be named for her great-grandmother.  This is the girly version of a baby boy card from a post on October, 22.  Instead of stamping the background, I found this wonderfully soft and shiny paper by SEI in my stash.  Which prompted the unusual color combination of Sweet Blush and Melon Berry.  Melon Berry is probably my least used PTI color and now I have used it twice in one day.  Go figure...

photo


The sentiment from Hanging Out, and "Naomi" are stamped with Smokey Shadow Ink and the Outline Alphabet letters are colored in with Copic markers.  The giraffe is die cut from the Sweet Baby dies. The tiny glittered heart on the giraffe's rump is a Martha Stewart graffiti punch. 

Just in case you didn't know, all of the products are from Papertrey Ink unless otherwise noted. 

Thanks for stopping by, 
Suzanne

Thursday, November 10, 2011

Holiday Card Boot Camp, Day 4, Project #1

Hi There!  It feels good to get my project for today posted a little earlier than usual.  Unfortunately, I did not get to try my hand at Project #2 for today which is an acetate card.  I am waiting for delivery of acetate card stock that should arrive on Monday.  Maybe I can catch up then.

My project today is a pocket card designed for enclosing a newsletter or perhaps cash.
It measures 3 3/4" X 8 1/2".  Starting with a sheet of 8.5 X 11" Kraft card stock, I scored the 11" side at 3 3/4" and again at 7 1/2".  I trimmed off 3/4"of the remaining section to form the pocket; making it fold up from the bottom of the card and give plenty of room to add the enclosure.  Staples were used to secure the sides of the pocket, but if I do this again, I will use 1/8th" scor-tape instead.

photo

I love the sentiment on the inside
photo

Here's the full view when the recipient opens the card

photo
It is so fun and interesting to use the sketches from designers like Kristina Werner, who presented the tutorial for the project I have shown here.  I am learning a lot!  Thanks goodness I have access to the class after it ends in two weeks.  I know I will refer to it again and again.

Well, laundry beckons!  I hope you have a most pleasant evening and I look forward to seeing you again tomorrow!

Thanks for stopping by, 
Suzanne

All products are Papertrey Ink unless otherwise noted.

Card stock:  Kraft, White, Pure Poppy
Patterned Paper:  Christmas Prints Collection
Stamp sets:  Wonderful Words: Holiday, Stylish Sentiments: Holiday, Holly Jolly
Dies:  Wonderful Words, Holly Jolly, Peace Be Still, Spellbinders Circles, large, Cuttlebug embossing folder
Ink:  Ranger, Black Soot and Peeled Paint distress inks
Red extra fine felt tip pen, Cream felt

Wednesday, November 9, 2011

Holiday Card Boot Camp, Day 3, Project #1

Hello All!
 
This card was a challenge and a delight to make!  Jennifer McGuire introduced us to some interesting techniques today and this is the result of her video tutorial.

It started with Hero Arts/Sizzix Stamp + Embossing Folder Holly stamped with Ranger Distress Ink Peeled Paint.  Secondly, I inked the inside of the embossing folder with Hero Arts Soft Sand Shadow Ink before running it through.  The stamped layer and the card base are Papertrey Ink Rustic Cream Cardstock  and the middle layer is Ripe Avocado.  The window was cut through each layer individually using Spellbinder Circles, Large, #3.  The first cut was on the card base.  After that, I marked the circle on each of the other two layers with a pencil to line them up correctly, taped the die in place and ran it through my Big Shot.  Other dies used are PTI Love Lives Here CollectionDouble Ended Banners, and Holly Jolly.  Sentiments inside and out are from Love Lives Here: Christmas. The base of the houses are stamped with PTI Pure Poppy Dye Ink.  The glittery "brads" are 1/4" punched circles of red glitter paper by  Recollections stacked on two layers of Pure Poppy Cardstock.

Front detail
photo

Inside
photo


Full View
photo

I am certainly getting some great ideas for Christmas cards and the opportunity to learn from some of the best designers in the business.  I plan to post at least one project a day for the duration of the class. I hope you will hang in there with me and offer some creative criticism! 

Thanks for stopping by, 
Suzanne

Tuesday, November 8, 2011

Make It Monday #40: Reverse Applique

Hi there!  Yes, this is my second post of the day.  I just loved this technique from Heather Nichols so I wanted to share with you my take on it.

photo

I really enjoyed making this card.  Using the three  papers from Papertrey Ink's Candy Cane Prints Collection made putting this together very simple.  Turning the papers in different directions made it much more interesting to me than trying to keep them on the same diagonal.  The three word sentiment from Stylish Sentiments: Holiday  stamped with Pure Poppy Ink, seemed like the perfect compliment to the three ornaments .  The card base is Pure Poppy card stock  and the background is White, both from PTI.  The white layer is adhered with dimensional adhesive.  My version of applique is made with a Sakura Red Star gel pen dotted all around the edges of the ornaments and pretending to be their hangers.  

I would love to hear your comments!

Thanks for stopping by, 
Suzanne

Day 1 Projects #1 and #2


Hi Everyone!  I hope you are also signed up for and getting inspired by the Holiday Card Boot Camp.  I participated in the Inspiration Showcase class held in September and learned some really great techniques and gained a lot of confidence in my style of card making.  If you are not signed up, take a look at the site. (onlinecardclasses.com)  Registration is open indefinitely.  Once you buy the class, all of the information is available to you for the rest of your life!  Not a bad deal for 30 bucks!

Enough infomercial...here are my projects from Day 1:

photo


This card is inspired by the video tutorial by Kristina Werner.  I maintained the basic sketch, but improvised the colors, ornament size and shape, as well as the sentiment.  I love a little sparkle and Christmas cards are a great place to use it!  The 12" X 12"glitter papers in Aqua, Citron, and Cherry, are from Recollections.  White card base is from Hobby Lobby.  White, Simply Chartreuse, and Spring Moss card stocks are from Papertrey Ink.  The sentiment, is from Tree Trimming Trio, by PTI and stamped with Pure Poppy Ink, also from PTI.  The scalloped border is by Fiskars.  The ornament and signature box are mounted on dimensional adhesive.  Dotted outline is made using a Sakura Red Star gel pen.  I always recognize Kristina's cards from her "signature" white dashed line around much of her work.  It gives so much oomph to her cards, I decided to try my own version of it and I am pleased with the results.

photo

Project #2 is based on a design by Jennifer McGuire.  For me, the outstanding part of the tutorial was learning how to make this beautiful, dimensional star.  Easy peasy and oh so pretty!  I used gold paper from Martha Stewart for the star and mat layer.  The branch and berries are stamps from a Papertrey Ink set called Out on a Limb,  The branch is heat embossed with gold powder and the berries stamped with PTI Pure Poppy Ink and enhanced with a Sakura Red Star gel pen. The 1/8' red satin ribbon ( same as used in previous card) has been around too long for me to remember the source.  The background is dry embossed with the Canvas Impression Plate from PTI.  White card base is from Hobby Lobby.

I have one more card to show you.  Sunday night, I was so anxious to get started on the HCBC, I decided to peruse the Hero Arts Blog to see if Jennifer, et al, might have any sneak peeks.  Well, no they didn't.  BUT I found this adorable design and tutorial by Shari Carroll.  I absolutely fell in love with Shari's "Button Christmas Tree".  Here is my version:

photo

This is certainly not one for mass production, but I think it is really special.  The buttons used include several flat clear buttons that have been backed with scraps of patterned paper.  Others are from PTI's Vintage Buttons Collection, in Vintage Cream. Still others are assorted white buttons that have found their way into my stash from who-knows-where; just like the fine silver thread used for the bow.  Clear gems are from Hero Arts, and the pearls are from Paper Studio.  The tree shape, and background papers are White Shimmer and Rustic Cream, respectively.  They are both from PTI.  The background was run through the Big Shot using PTI's Woodgrain Impression Plate.  Ink used is Aqua Mist, by PTI on the edges of the "snowdrift", and Vintage Sepia, by Tsukineko for the sentiment.  The card base and tree trunk are Soft Suede, by Stampin' Up!.  Button twine is from Michael's.  Finally, a little Martha Stewart Fine Crystal Glitter was glued on to the upper edge of the snowdrift at the bottom of the card.

I hope you have been inspired to check out Holiday Card Boot Camp.  Tomorrow is day 3 so you haven't missed too much to catch up!  Day 2 was all about photo cards and the ideas and tips are terrific! I won't be posting anything from Day 2 since I don't use photo cards.

Thanks for stopping by, 
Suzanne

Tuesday, November 1, 2011

Make It Monday #39: Multi-stamp Background Building

Hi All!

I am kind of excited to show you what I came up with for this challenge.  First of all, I fell in love with the idea of making beautiful desk calendars as gifts for friends last Christmas, then something happened and I never did.  I bought the mini calendars from Papertrey Ink, along with the die for the calendar page and the Calendar Basics stamp set, of course.  So this year I am ready to start again with new 2012 mini calendars and...today's post on Nichole's blog is a revisit to Calendar Basics!  Yeah!! So between today's post and the MIM challenge from yesterday, I have the first page of my calendar project to show you.  I guess I will work my way back from December to January.

photo

All of these stamps are from PTI Bells and Boughs.  I started with the larger poinsettia using my new Pure Poppy Ink. (Such rich, saturated color...I love it!)  The next step for me was to use the smallest pine bough image around the edges of the card stock only.  I used Ranger  Shabby Shutters Ink.  The next step was to apply the smaller poinsettia using Ranger Lady Bug Ink for variety of color.  After working these in, I was ready to finish filling in with more of the pine bough image.  The final step, was taking the cue from Nichole's video to use a little black accent to give some punch to the flowers.  For this, I used the smaller berry cluster in Memento Tuxedo Black Ink.  As you can see, I embellished the calendar page with the smaller poinsettia and a few more pine boughs, stamped the month in black ink, distressed the edges of the calendar as well as the edges of the background page with PTI Chai Tea Dye Ink.  After matting the mini-calendar with True Black Card Stock, I added a little liquid glue to the under sides of the tiny tabs that hold the calendar in place.  The extra bulk of adding the mat caused them to stick out.  The final detail should have been left off.  I really like a little sparkle on everything I make, but in this case, using the Sakura Clear Star Pen actually dulled the black centers on the flowers instead of enhancing them.  Live and Learn.  At any rate, I am delighted to have the first page of my first calendar project completed.  I will be interested to see how many other multi-stamp backgrounds I come up with before the calendar is finished!

I hope you will leave a comment for me,
Thanks for stopping by!

Suzanne