Friday, May 11, 2012

Make It Monday #65


Good Morning and Happy Friday!  

The challenge from Dawn McVey this week is called "Background Patterns from Patterned Paper Scraps".  Check out her video HERE.  It took two days for me to work through an idea I had in my head and another two days for me to muster the courage to post it here, today.  I hardly ever use patterned papers so I don't have a big supply of scraps.  This challenge really revealed how difficult it is for me to coordinate patterns and colors.  I actually have three different projects-two I am happy with, the other...well let's just say it could still end up in the trash.  

Here's my submission for the challenge:


  I had this small pile of 1/4" strips and quite by accident, found that I could line up the dots giving the impression of multi-colored stripes.  Voila!  I had a background made from five different patterned papers!  For the focal image, I chose to work with felt, I used an assortment of Flower Fusion Dies, hand trimmed the leaves, and used 1/4" and 1/8" hole punches for two of the flower centers to embellish the mat stack #3 frame.  This sentiment is going to get quite a work out as I make LOTS of birthday cards and love to use the word "FABULOUS"! This large dot pattern is truly a new favorite for me-in all of the colors.  I am delighted that I will have the opportunity to have it in such a large assortment of colors as these pattern packs continue to be released.

Here is the source of the 1/4" scraps that inspired my design:

                                     
This is a Mother's Day gift for my daughter, which includes 8 cards with white envelopes lined with coordinating colors.  I actually forgot that I had the same pattern in Melon Berry until I was creating the challenge card.  She will receive two more cards in the additional color!

Finally, my first attempt at coordinating patterns for this challenge:


There is just too much going on in this card for me-It feels forced and I was not very satisfied.  I had this image in my head of a rather CAS card, vertical orientation with the large focal image and a small white strip across the bottom to carry the sentiment but it didn't work.  I really like the bright Summer Sunrise "hello" against the large dots so the orientation changed and this is how it ended up.  

So, that's what I've been up to in card-making this week.  Hope your weekend is full of sunshine and you get to enjoy a little time off from the weekly routine.  Ta-ta for now!

Thanks for stopping by, 
Suzanne

Supplies:  All PTI unless noted
Cardstock:  (1) Soft Stone, Raspberry Fizz
                   (2) Soft Stone, Smokey Shadow, Raspberry Fizz
                   (3) Soft Stone, White, Summer Sunrise
Pattern Paper:  Pattern Packs in Smokey Shadow, Melon Berry, Simply Chartreuse, Aqua Mist, Raspberry Fizz
Ink:  VersaFine Onyx black
Stamp set:  Tagged Sentiments
Dies: (1) Mat Stack #3, Layerz #3, Flower Fusion #1, #3, #12
         (2) Block Alphabet, lower case
         (3) Notched Flowers, Rosie Posie, Block Alphabet
Other:  Polka Dot Brad, 1/4" and 1/8" hole punches

Tuesday, May 1, 2012

Make It Monday #64: Using Color Inspiration


Hi Friends!  Happy Tuesday to you.  Things are really poppin' at PTI, aren't they?  Not only is there a dynamite choice of color inspiration photos to choose from for this week's Make it Monday, but the REALLY BIG NEWS is that we can pre-order Stamp-A-Faire supplies!  I can hardly wait for July 21st.  To get the scoop, click HERE.

Ok.  Now that I have stopped hyperventilating, I want to share with you the card I made using this color inspiration:

Color-challenge-7


I think color challenges are the most difficult for me.  This was no exception.  First of all, I had trouble choosing one to work off of.  Each one is so pretty.  (Maybe I'll try another one or two before the week is over.)  Secondly, there were five colors in each inspiration photo!  I rarely use more than three.  To make it even more challenging, Nichole encouraged us to use "the rule of three" for visual balance and continuity.  I think I fulfilled the requirements and I am pleased with the results of my card.  I really enjoyed combining and arranging the elements.  I only managed to use "Fine Linen" as a mat layer-just could not effectively incorporate it into this design. I even tried it as the card base, which looked good, but this was just better, you know? The actual colors are much softer than the photo...sorry I couldn't get better lighting.

I hope you have a wonderful rest of the week.  I woulds love to hear any thoughts you would like to share about this project before you go.

Thanks for stopping by,
Suzanne


Supplies:  All Papertrey Ink unless noted
Card Stocks:  Kraft, Fine Linen, Terra Cotta Tile, Aqua Mist, Vintage Cream
Inks:  Palette Haystack, Aqua Mist, Classic Kraft, Dark Chocolate
Stamps:  Take Note, Sending You, Half & Half, BB:Postmarks
Dies:  Sending You, Half & Half, Notched Flowers
Other: 1/2" and 3/4" circle punches by EK Success

Thursday, April 26, 2012

Tuesday Trigger: Watercolor Butterflies


To see the original post, click HERE


Hi there, Blog Buddies!  I'm kinda stoked about this one! I was immediately inspired by the brilliant colors on the sheer, soft fabric, but it took a long time for me to decide how to execute it.  I wanted to see the soft, translucent texture that I thought coffee filter paper would provide.  I am very happy with the results.  They even look a little like a natural butterfly wing.


After cutting the shapes from PTI"s Beautiful Butterflies dies, I pulled out my craft sheet and put three colors of Distress Ink, Wild Honey, Worn Lipstick, Seedless Preserves directly onto the sheet, laid out the butterflies and misted all of it with water.  The wet butterfly die cuts were then blotted and dragged through the puddles of ink until I covered each one with color.  This of course, gave me a totally random variation of color on each one. (SO FUN) I dried them with my heat gun because I couldn't wait to see them finished.  I cut many more than I needed, so I have several more to use on future projects. (Yippee!) I am particularly pleased with the way the wings overlap in the finished project.  It seems to add movement.

To assemble the card, I cut white card stock for the base, and a piece 3.5" X 5", stamped the sentiment, also from Beautiful Butterflies Stamp Set on the bottom with Berry Sorbet ink, and ran it through my Big Shot using the Linen side of my Canvas and Linen Impression Plate.  I then stamped three butterfly images and adhered the body only of each die cut to the silhouette underneath.  The  Berry Sorbet Card Stock layer is popped up on dimensional foam to add to the airy feel of the card.

That's it, folks, my first ever submission to Tuesday Trigger!  I know, it has been a long time coming...what a great site!  Cath is so Moxie Fab!

Thanks so much for stopping by, you are always welcome here!
Suzanne

Wednesday, April 25, 2012

Papertrey Ink & A Blog Named Hero challenges


April 2012 Blog Hop

Blog-hop-logo
Inspiration Challenge #1
Blog hop inspiration
AND #2
Actually, I was a little stumped by the PTI inspiration picture until I saw the Card With A View Video here.  I even started the project with my new Tweet Talk set from PTI until I had a vision of how to frame those gorgeous fabrics as if I were window shopping.  The idea of lingering with my nose pressed to the glass as I took in the beauty, made this simple card all the more appealing to me!  As a child, I spent a lot of time in fabric stores while my mother dreamed and designed clothes and home furnishings.  She was a very talented seamstress.  So of course, this card is a tribute to her even though she passed away seven years ago. 
Obviously, I was inspired by the blue striped pattern at the top of the stack and again by the bright pink damask in the middle of all of those fabulous roses.  (Can you believe I didn't use Rosie Posie this time?)  So here is the result of this combined inspiration:

and from the inside:


I hope you enjoy seeing ALL of the inspirations in each of these challenges.  You have until midnight tonight (edt) to enter each of them...check it out!

Supplies:  PTI unless otherwise noted
Card Stock:  White
Patterned Paper:  Raspberry Fizz Pattern Paper Pack
Ink:  Spring Rain, Spring Moss, Hibiscus Burst, Versafine Onyx Black
Stamps:  BB: Distressed Stripes, Mat Stack #5, Verve Stamps Love Deepens
Dies:  Mat Stack #5, Layerz #5
Other:  Martha Stewart Ball Point Tip Glue Pen

Thanks for stopping by, 
Suzanne


Monday, April 23, 2012

MIM #63 Glitter Die Cuts

Happy Monday!  Another fun challenge from Heather Nichols today, check out the video here.


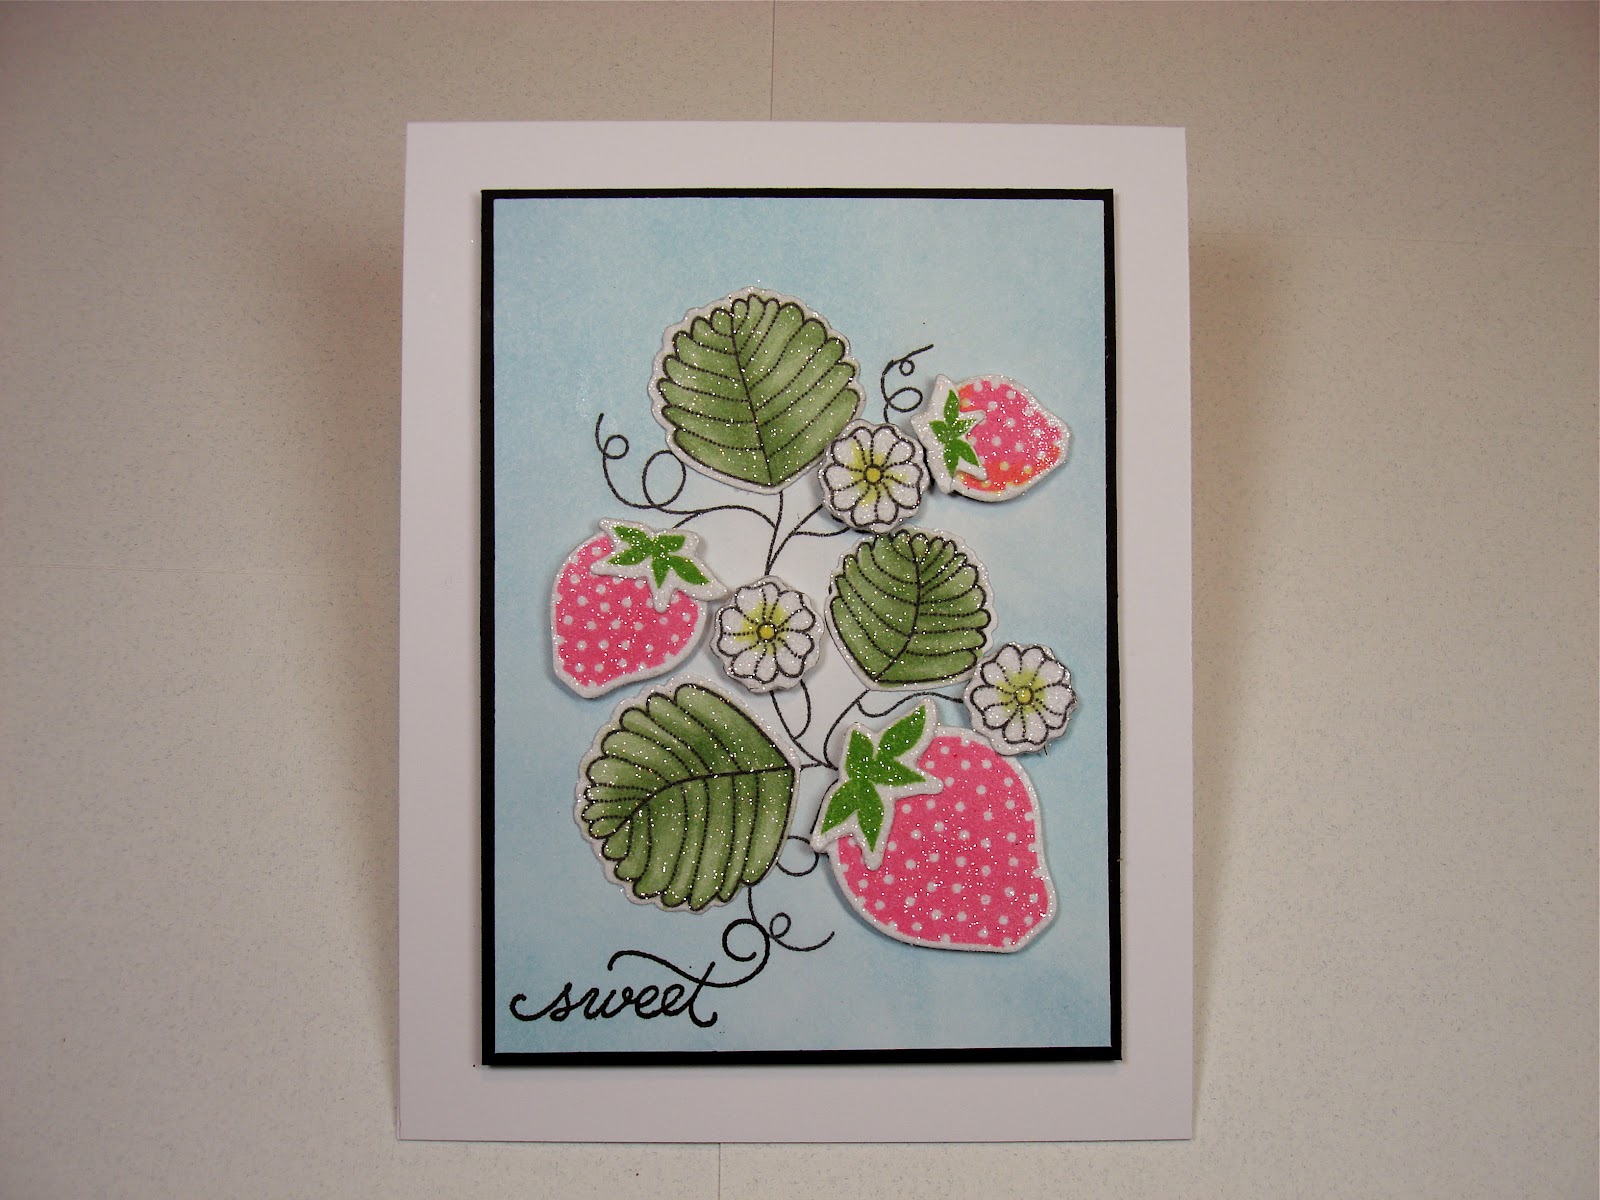
This card is very simple and straight forward.  I trimmed a piece of white card stock to 3 1/4" X 4 1/2" and used a distress Ink applicator with Tumbled Glass Ink to create the soft blue background.  I stamped the large strawberry cluster image onto the card stock then proceeded to use all of the dies to cut the leaves, berries and flowers.  I stamped each element, using the outline stamps for the leaves and flowers, and  the fill-in images for the berries and tops.  I used Copic markers for color on the leaves and flowers.  Using Heather's advise, I ran each element through my Xyron sticker maker, front side down and then sprinkled each piece with glitter, brushing off the excess with a soft brush. The leaves and berry tops were adhered flat with a liquid glue while the berries and flowers were popped up on dimensional foam.  The word "Sweet" was stamped in the lower left corner. Finally,  I adhered the image layer onto black card stock cut to 3 3/8" X 4 5/8", then popped up the black layer onto the 4 1/4" X 5 1/2" standard card base.


I love Martha Stewart Crystal Fine glitter.  It looks like sugar coating to me which sounds delicious on these super sweet berries!  I hope this card stimulates your appetite for some sugary sweet fun with glitter.  I look forward to seeing your submissions for the challenge, too!

Thanks for stopping by,
Suzanne


Supplies:  All Papertrey Ink unless noted


Cardstock:  White, True Black
Ink:  Hibiscus Burst, New Leaf, Memento Tuxedo Black
Stamps:  Strawberry Patch
Dies:  Strawberry Patch 
Copic Markers, Martha Stewart Crystal Fine Glitter and Ball-point tip glue pen, Dimensional Foam 

Sunday, April 22, 2012

CFC49


Wow!  I love the new blog banner at CAS-ual Fridays designed by Girl Friday, Karen Baker.  Karen, you and I need to talk...

So, I unfortunately need a get well card for a friend and nothing like a need for a "real" card to get me going AND I love the simple sketch for this week's challenge.  Here's my card:


I had just received my new shipment from Papertrey Ink, and was playing around with the Notched Flowers dies when I realized that I could use these for the challenge.  Since they were already cut out in Pure Poppy and Raspberry Fizz felt, it was pretty easy to just plop them on the card.  After cutting the Vine Border  from Ripe Avocado card stock, I ran the two trimmed pieces through my Xyron.  Ever hear of "glue buggers"?  That's a term I learned from  Julie Ebersole to describe the stringy glue hanging out around the edges of the newly created sticker.  She taught me to use the smaller end of my stylus to go around the outer edge of my die cut before removing the top paper from whatever I have put through the Xyron.  It works like a charm!  This may be the quickest card I have ever made.  Since it was going so smoothly, I decided a lined envelope would be a nice finishing touch.  I used Bitty Dot Basics for that little job and now I have a happy card to send to my friend.

I have already glanced at some of the submissions to the CAS-ual Fridays challenge and they look amazing!  Hope you join in the fun, too!

Thanks for stopping by,
Suzanne

Friday, April 20, 2012

Make It Monday # 62: Step It Up: Layering


Hello there!  Long time no see ya!  I've been hiding out doing a little Spring cleaning and it took ALL of my creative energy to purge and reorganize my craft space.  I was able to fill a box with goodies that were taken to a local Senior Center.  It feels good to have passed along some well loved supplies for someone else to enjoy.

This was a fun challenge from Betsy Veldman for this weeks Make It Monday.  The idea was to create a one layer card and then re-create it by adding some layers.  Betsy demonstrated using three cards so I did three also.


While technically this card has three layers to start with, each element is adhered without any dimension so the overall effect is that of a one layer card.


The Aqua Mist mat and the stamped and scored panel are adhered flat.  The pinked circle with the attached sentiment and flower image is on dimensional foam adhesive.  the butterfly was attached with scor-tape at "the body" only so that the wings were free to lift.  The butterfly image is also stamped on the card base under the die cut.


On the third card,  I used a technique that I had never tried before.  For the stamped center panel, I scored approximately 1/4" on either side of the image and folded the card stock back and secured it with scor-tape giving it a smooth, rounded, edge and effectively a double thickness before I adhered it to the Kraft layer.  The bottom half of the sentiment circle is popped up on regular foam adhesive while the upper portion has extra thick dimensional foam.  Again the butterfly is attached at the body section with the wings free to lift. 

Below you will find a complete supply list.  I would love to hear which of these you like best.  (The first one is my favorite).  I hope you have a great weekend!

Thanks for stopping by,
Suzanne

All supplies are PTI unless noted
Card stock:  White, Aqua Mist, Kraft
Pattern Paper:  Aqua Mist Pattern Pack (card 3 only)
Stamps:  BB:Medallions, Take Note, Happy Trails, Daydreamer (card 2 flower)
Inks:  Classic Kraft, Aqua Mist
Dies:  Happy Trails, Limited Layers 1 3/4" Circles
Other: Brown Glitter Domes